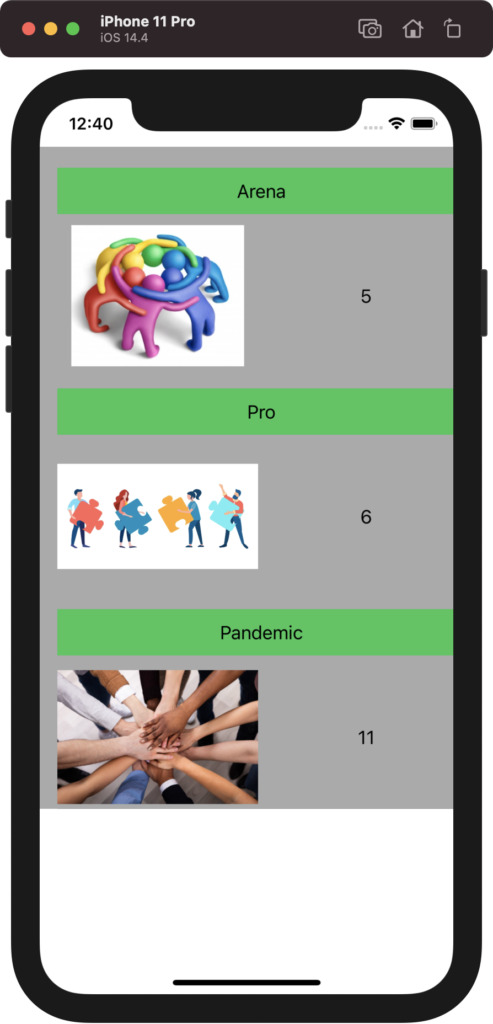
How to Create Custom Cells in a TableView in Swift using Xcode
Follow the below steps to create custom cells in TableView.
- Create the UITableView object in the Storyboard, and define the constraints.
- Drag and drop the UITableViewCell inside the TableView
- Create the components e.g. Labels, UIImageView etc. inside the UITableViewCell, created in the previous step. The storyboard ViewController will look something like below.

4. Select the UITableViewCell from the StoryBoard and provide an Identifier as “Cell”. You can provide any name, however the same should be used while returning the UITableViewCell in the ViewController.
5. Connect the TableView outlet to the ViewController, which will act as the UITableViewDelegate and UITableViewDataSource
6. Below is the ViewController Code that serves as UITableViewDelegate and UITableViewDataSource
import UIKit

class ViewController: UIViewController, UITableViewDelegate, UITableViewDataSource {

    var model = [CellModel]()//We will define the CellModel Class in the next step

    @IBOutlet weak var tableView: UITableView!
    override func viewDidLoad() {
        super.viewDidLoad()
        // Do any additional setup after loading the view.
        populateData()
        tableView.dataSource = self
        tableView.delegate = self
    }

    func populateData() {
        model.append(CellModel(teamName: "Arena", imageView: UIImageView(image: UIImage(named: "team1")), teamStrength: "5"))
        model.append(CellModel(teamName: "Pro", imageView: UIImageView(image: UIImage(named: "team2")), teamStrength: "6"))
        model.append(CellModel(teamName: "Pandemic", imageView: UIImageView(image: UIImage(named: "team3")), teamStrength: "11"))
    }

    func tableView(_ tableView: UITableView, numberOfRowsInSection section: Int) -> Int {
        return model.count
    }

    func tableView(_ tableView: UITableView, heightForRowAt indexPath: IndexPath) -> CGFloat {
        return 200.0
    }

    func tableView(_ tableView: UITableView, cellForRowAt indexPath: IndexPath) -> UITableViewCell {
        let cell = tableView.dequeueReusableCell(withIdentifier: "cell") as! TableViewCell
        let cellModel = model[indexPath.row]
        cell.teamName.text = cellModel.teamName
        cell.imageView1.image = cellModel.imageView.image
        cell.teamStrength.text = cellModel.teamStrength
        return cell
    }

}
7. Define the Model Class for the Cell, that will have all the contents of each cell as variables.
import Foundation
import UIKit

class CellModel {
    var teamName: String
    var imageView: UIImageView
    var teamStrength: String
    init(teamName: String, imageView: UIImageView, teamStrength: String) {
        self.teamName = teamName
        self.imageView = imageView
        self.teamStrength = teamStrength
    }
}
8. Define a class of type UITableViewCell, and reference that class in the properties of the UITableViewCell object in the StoryBoard. Make sure you connect the objects of the UITableViewCell in StoryBoard to the variables defined in TableViewCell
import UIKit

class TableViewCell: UITableViewCell {

    @IBOutlet weak var teamName: UILabel!
    @IBOutlet weak var imageView1: UIImageView!
    @IBOutlet weak var teamStrength: UILabel!

    override func awakeFromNib() {
        super.awakeFromNib()
        // Initialization code

    }

    override func setSelected(_ selected: Bool, animated: Bool) {
        super.setSelected(selected, animated: animated)

        // Configure the view for the selected state
    }

}
The final table view looks as below
