Get Started with React Apps
Initial Setup
1)Download NodeJS to get the npm in you machine
2) Make sure the npm package is installed by running : npm –version
3) Install the npm package create-react-app : npm install create-react-app
4) Create the react application : npx create-react-app myapp
Once the step 4 is completed, a development server will be started and will run a sample react application on http://localhost:3000
Important Files & Basic Flow
How the JSX Code is compiled with React JS?
Below 2 functions are equivalent and renders the same thing in browser:
Using JSX
function App() {
  return (
   <div className="App">
     <p class="blocks">Hi This is my first react application</p>
   </div>
  );
}
Using compiled Code
function App() {
  return React.createElement('div', null, React.createElement('h1', {className: 'App'}, 'This is my first React Application'))
}
Look at how the JSX Code (that looks like HTML), is converted by React using React.createElement() function that takes 3 arguments:
1)Root Element
2)JS Object that represents the attributes of the previous element
3)Child Elements
Creating your own Components and Using them
Look at the below 2 Components:
Person.js
const person = (props) => {
    return <p>Hi this is {props.name} and I am {props.age} years old. {props.children}</p>
}
export default person
Student.js
const student = (props) => {
    return <p>Hi this is {props.name}. I am a Student and I am {props.age} years old.</p>
}
export default student
Use the Components in your App.js
import './App.css'
import React from 'react'
import Person from './Person/Person'
import Student from './Student/Student'

function App() {
  return (
    <div className="App">
      <Person name="Animesh" age="37">I am the head of the family.</Person>
      <Student name="Aishani" age="9"/>
      <Person name="Moumita" age="34"/>
      <Student name="Sudipto" age="3"/>
      <Person name="Sarala" age="27"/>
      <Student name="Esha" age="10"/>
    </div>
  );
}
export default App;
Output

Using State in React Apps to update the DOM without Page refresh using the Class Approach
Let’s create a simple Toggle button and see how we can update the DOM without page refresh.
App.js
import './App.css'
import React from 'react'
import Person from './Person/Person'
import Student from './Student/Student'

class App extends React.Component {
  state = {
    persons: [
      {name: "Moumita", age: 34},
      {name:"Sarala", age: 27}
    ],
    flag: true
  }

  switchUserHandler = () => {
    console.log("Clicked !!!!")
    if (this.state.flag) {
      this.setState(
        state => ({
          persons: [
            {name: "Mou", age: 40},
            {name:"Sarala", age: 27}
          ],
          flag: false
        })
      )
    } else {
      this.setState(
        state => ({
          persons: [
            {name: "Moumita", age: 34},
            {name:"Sarala", age: 27}
          ],
          flag: true
        })
      )
    }

  }

  render() {
    return (
      <div className="App">
        <button onClick={this.switchUserHandler}>Click Me</button>
        <Person name={this.state.persons[0].name} age={this.state.persons[0].age}>I am the head of the family.</Person>
      </div>
    );
  }
}

export default App;
Person.js
import React from 'react'

class Person extends React.Component {
    render() {
        return <p>Hi this is {this.props.name} and I am {this.props.age} years old. {this.props.children}</p>
    }
}

export default Person
Output

Upon Click!!

Important Note : state must be defined as a JavaScript Object
Using state as a Hook in React
In the above example, we had to use a class in order to use state, however from React 16.8, Hooks were introduced that helps to use few of the popular use cases, without using classes and without sub classing the Component class. Remember that a Hook is called inside a function Component.
Here is an example explaining how you can easily use the function hooks to maintain the state.
App.js
import './App.css'
import React from 'react'
import Student from './Student/Student'

function App() {
    return (
      <div className="App">
        <Student></Student>
      </div>
    );
}

export default App;
Student.js
import React, { useState } from "react"

function Student(){
    const [stdCount, setNewCount] = useState(0)
    return (
        <div>
            <button onClick={() => setNewCount(Math.floor((Math.random()*100)))}>Students Count</button>
            <p>I am Student Number {stdCount} </p>
        </div>
    )
}

export default Student
Output


Note that in Student.js, useState function that comes from React, defines the initial value of the state as 0 and stores into stdCount, and it defines a function setNewCount, to which we can pass any argument representing the new value of the state.
const [stdCount, setNewCount] = useState(0)
In Student.js, the below line says that upon button click, the setNewCount function is called and a new random value to the nearest 100 is passed, thus resetting the state of the variable stdCount
<button onClick ={() => setNewCount(Math.floor((Math.random()*100)))}>Students Count</button>
Styles in React
Inline Style
Inline style can be incorporated in any React Components by defining a style variable and using it as an attribute to the JSX elements similar to HTML. Example below:
import './App.css';

const style = {
  backgroundColor: 'red',
  color: 'white',
  fontSize: '40px'
}

function App() {

  return (
    <div style={style}>
      <p>Learn React</p>
    </div>
  );
}

export default App;
Note that the css attributes are different, and are mostly in camelCase.
Some of the styles e.g. :hover, :focus etc. doesn’t work without an external package. To get those working, install a package called Radium:
npm install –save radium –legacy-peer-deps
Then define your style as below, and wrap the components inside Radium:
import './App.css';
import Radium from 'radium'

const style = {
  backgroundColor: 'red',
  color: 'white',
  fontSize: '40px'
}

const buttonStyle = {
  backgroundColor: 'grey',
  color: 'red',
  ':hover': {
    backgroundColor: 'orange',
    color: 'white'
  }
}

function App() {

  return (
    <div style={style}>
      <p>Learn React</p>
      <button style={buttonStyle}>Click Me</button>
    </div>
  );
}

export default Radium(App);
In order to define the style inline, use the following syntax:
import React, {Component} from 'react'
class App extends Component {
    render() {
        return (
            <h1 style={{backgroundColor: 'red', color: '#fff'}}>This is App.js</h1>
        )
    }
}

export default App
How to display lists using React?
Suppose you have a Person Component, and you want to display all those components with different data in each, in the form of a list. Here is how you can do:
Person.js
const PersonStyle = {
    border: '1px solid black',
    margin: '10px',
    padding: '10px'
}

const Person = (props) => {
    return(
        <div style={PersonStyle} >{props.children}</div>
    )
}

export const PersonList = (props) => {
    const names = ['Animesh','Moumita','Aishani','Sudipto', 'Laxmi Kanta Banerjee']
    const finalNamesList = names.map((value,index) => {
        return <Person key={index}>{value + " Banerjee"}</Person>
    })
    return finalNamesList
}
App.js
import {Person} from './Person/Person'
import {PersonList} from './Person/Person'
const style = {
  backgroundColor: 'red',
  color: 'white',
  fontSize: '40px',
  textAlign: 'center'
}

const PersonStyle = {
  backgroundColor: 'grey',
  color: 'white',
  fontSize: '20px',
  textAlign: 'center',
  marginLeft: '200px',
  marginRight: '200px'
}

function App() {
  return (
    <div>
      <p style={style}>Learn React</p>
      <div>{PersonList()}</div>
    </div>
  );
}

export default App;
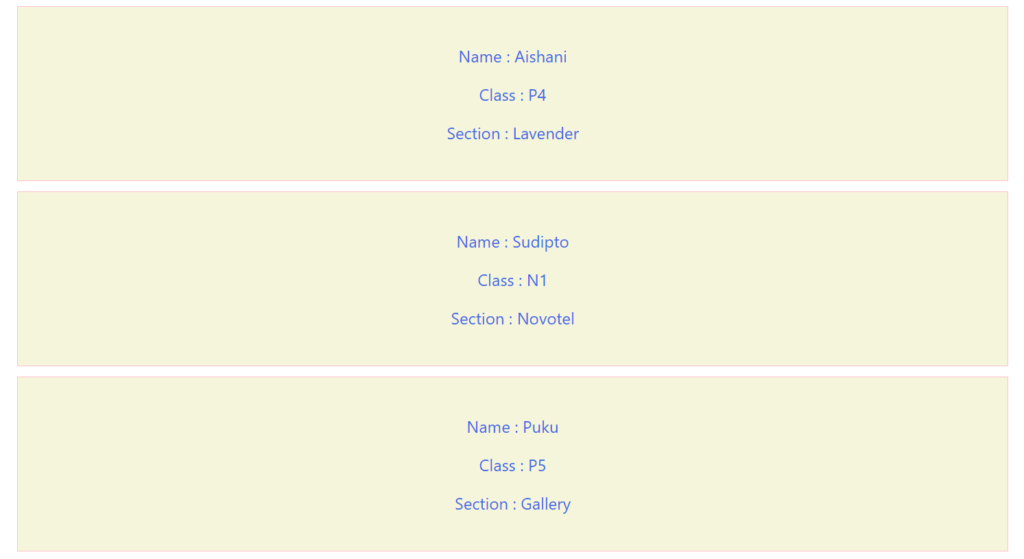
Output
Display Lists
If you want to display a list of items, each of which represent the same component with different state, here is how you can do that:
App.js
import {StudentList} from './ListExample/Students/StudentList'
function App() {
  return (
    <div>
      <StudentList/>
    </div>
  )
}

export default App;
StudentList.js
import Student from './Student'
const studentsCollection = [
    {name: 'Aishani', class: 'P4', section: 'Lavender'},
    {name: 'Sudipto', class: 'N1', section: 'Novotel'},
    {name: 'Puku', class: 'P5', section: 'Gallery'}
  ]
export const StudentList = (props) => {

    const stdList = studentsCollection.map((value, index) => {
        return(
            <Student name={value.name} class={value.class} section={value.section}/>
        )
    })

    return stdList
}
Student.js
import './Student.css'
const Student = (props) => {
    return (
        <div className="studentComponent">
            <p>Name : {props.name}</p>
            <p>Class : {props.class}</p>
            <p>Section : {props.section}</p>
        </div>
    )
}

export default Student
Student.css
.studentComponent {
    background-color: beige;
    color: royalblue;
    text-align: center;
    margin-left: 150px;
    margin-right: 150px;
    padding: 20px;
    border: 1px solid pink;
    margin-bottom: 10px;
    margin-top: 10px;
}
Manage the state of the components using useState [React Hook]
The state of components can be managed either by using a Class or a function. Before React V16.8, we could only manage the states using Class, but from V16.8, there is a concept called React Hook that helps to manage the state using functions.
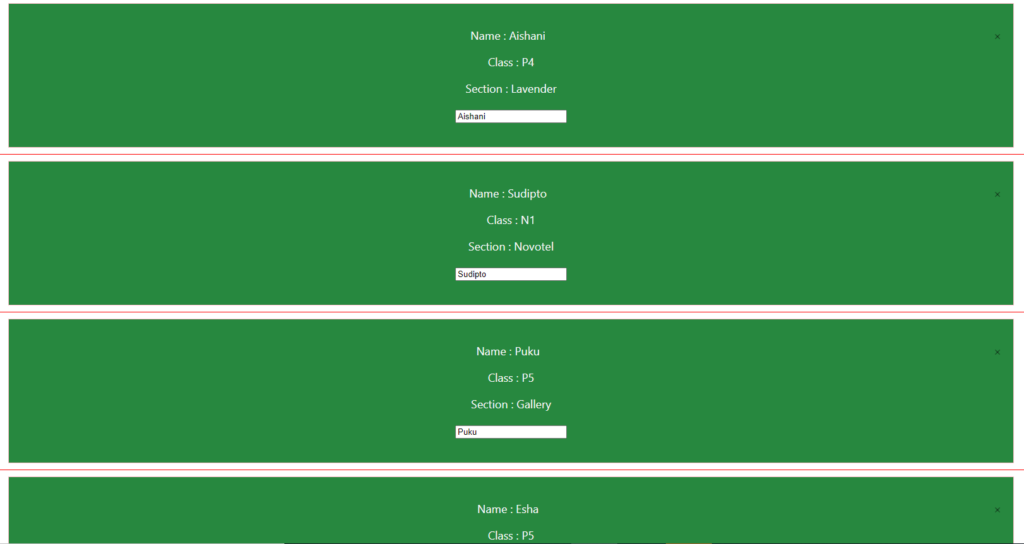
Below example shows a dynamic list of components. Each component can be removed by clicking a cross attached to it.
The component data comes from an array of objects, that is initially defined as the original state. Each click, modifies the array using the React Hook useState. Example below:
App.js
import './App.css';
import React from 'react'
import {useState} from 'react'
import {StudentList} from './ListExample/Students/StudentList'

const style = {
  backgroundColor: 'red',
  color: 'white',
  fontSize: '40px',
  textAlign: 'center'
}

const PersonStyle = {
  backgroundColor: 'grey',
  color: 'white',
  fontSize: '20px',
  marginLeft: '200px',
  marginRight: '200px'
}

const buttonStyle = {
  backgroundColor: 'grey',
  color: 'red',
  ':hover': {
    backgroundColor: 'orange',
    color: 'white'
  }
}
function App() {
  return (
    <div>
      <StudentList/>
    </div>
  )
}
export default App;
StudentList.js
import Student from './Student'
import {useState} from 'react'
import cross from '../../images/cross.png'

export const StudentList = (props) => {

    const studentsCollection = [
        {id: 34242, name: 'Aishani', class: 'P4', section: 'Lavender'},
        {id: 2342342, name: 'Sudipto', class: 'N1', section: 'Novotel'},
        {id: 98979, name: 'Puku', class: 'P5', section: 'Gallery'},
        {id: 9787648, name: 'Esha', class: 'P5', section: 'Gallery'},
        {id: 97987, name: 'Gopu', class: 'P5', section: 'Gallery'},
        {id: 4245345, name: 'Golu', class: 'P5', section: 'Gallery'},
        {id: 5345353, name: 'Aishu', class: 'P5', section: 'Gallery'}
      ]

    //studentsCollection is the initial state and is stored in stdCol.
    //updateStdCol is a defined function that can be called anytime to update
    //the state.
    const [stdCol, updateStdCol] = useState(studentsCollection)
    //Best Practice is to copy the original array into another array using
    //the spread operator, so that the original array remains intact
    const newStdCol = [...stdCol]

    const studentClicked = (ID) => {
        //This is a find operator that can be called on an array of objects,
        //and we can pass the parameter based on which the object needs to be
        //searched in the array and returned accordingly
        //=== operator does both type and value match
        const position = newStdCol.find(({id}) => id === ID)
        newStdCol.splice(newStdCol.indexOf(position),1)
        //Remember that for updating the state, we cannot just invoke updateStdCol(newStdCol)
        //Rather, you need to use the spread operator to pass the actual array, in order to
        //perform the update.
        updateStdCol([...newStdCol])
    }

    const stdList = stdCol.map((value) => {
        return(
            <div style={{borderBottom: '1px solid red'}}>
                {/*
                    Note that an unique key is required by the React Framework to maintain and keep
                    tract of a dynamic list
                */}
                <Student name={value.name} class={value.class} section={value.section} key={value.id} click={() => {
                    studentClicked(value.id)
                }}>
                    <img src={cross} alt='' width='10px'/>
                </Student>
            </div>
        )
    })

    return stdList
}
Student.js
import { useState } from 'react'
import './Student.css'
const Student = (props) => {

    const [orgName, updateName] = useState(props.name)
    return (
        <div className="studentComponent">
            <p style={{float: 'right'}} onClick={props.click}>{props.children}</p>
            <p>Name : {orgName}</p>
            <p>Class : {props.class}</p>
            <p>Section : {props.section}</p>
            {/*
                Note how we can pass an onChange event on an input field
                and update the state value using the event.target.value parameter
            */}
            <p><input type="text" value={orgName} onChange={(event) => {
                updateName(event.target.value)
            }}/></p>
        </div>
    )
}

export default Student
Output
Using ErrorBoundaries to catch Execution Errors
To catch any error while JSX execution, you can wrap your return statements with the <ErrorBoundary> tag that has to be predefined and exported as a Component. Below is an example:
App.js
import React, {Component} from 'react'
import ErrorBoundary from './ErrorBoundaries/ErrorBoundary'
class App extends Component {
    render() {
        return (
            <ErrorBoundary>
                <h1 style={{backgroundColor: 'red', color: '#fff'}}>This is App.js</h1>
            </ErrorBoundary>
        )
    }
}

export default App
ErrorBoundary.js
import React, { Component } from 'react'

class ErrorBoundary extends Component {
//This is where the error state is maintained
    state = {
        hasError: false,
        errorMsg: ''
    }

//This is a callback that is invoked by React to populate and update the state, whenever there is any error
    componentDidCatch = (error, info) => {
        this.setState({
            hasError: true,
            errorMsg: info
        })
    }

//We are creating a chance using this function, so that it returns error 50% of the times
    errorParam = () => {
        return (Math.random() > 0.5) ? true:false
    }

    render() {
        if(this.errorParam()){
            this.componentDidCatch(new Error(), 'BAD URL ERROR')
        }
        if(this.state.hasError){
            return(
                <h1>There is some error</h1>
                )
        } else {
            return(
                <h1>There is NO error</h1>
                )
        }
    }
}

export default ErrorBoundary
Class Based vs Functional Components
| Class Based Components | Functional Components |
|---|---|
| class <Component Name> extends Component { render() { return( <h1>This is a Class Based React Component</h1> ) } } | const <Component Name> = (props) => { return( <h1>This is a functional React component</h1> ) } |
| Can access state using this.state, and the state can be updated using this.setState(<pass the updated JS state object>) | Can access state using useState() function. Previously functional components did not have access to state, but from React 16.8, the useState() function can be used to define the state variables and the functions that is used to update the state variable. Example: const [personState, updatePersonState] = useState({ name: ‘Animesh’, age: ’37’ }) Here a new variable personState is defined that holds the JS object passed as an argument to useState function, and updatePersonState is the function that can be called to update the personState, by passing the new personState object as a parameter to the function. |
| Can access LIfecycle Hooks | Cannot access Lifecycle Hooks |
| Access state and props via this keyword Example : this.state.value, this.props.value | Access state and props directly. Example: state.value, props.value |
Lifecycle Methods for Class based Components
| Lifecycle Method Called in Order | Description |
|---|---|
| constructor(props) { super(props) //Other Initialization Code } | Called first time while initializing a Component |
| render() | Helps to render the JSX Code |
| componentDidMount() | Called at the end after rendering. It can be used to do any cleanup activity |
| shouldComponentUpdate(nextProps, nextState) | Called when a Component’s state is updated. This should return either true or false |
| getSnapshotBeforeUpdate(prevProps, prevState) | You can capture the previous props and state variables before the actual update. |
| componentDidUpdate() | Called once Component Update has been done. You can perform any cleanup in this function. |
componentDidCatch(error, info) | This is called when there are any errors |
componentWillUnmount() | componentWillUnmount() is invoked immediately before a component is unmounted and destroyed. Perform any necessary cleanup in this method, such as invalidating timers, canceling network requests, or cleaning up any subscriptions that were created in componentDidMount(). You should not call setState() in componentWillUnmount() because the component will never be re-rendered. |
Implement Lifecycle Methods for React functional components
You can use useEffects() method inside the functional components to get hold of the lifecycle methods, similar to Class based components. You can think of useEffect Hook as componentDidMount, componentDidUpdate, and componentWillUnmount combined.
Look at the example below that shows
import React, {useState, useEffect} from 'react'
const App = () => {
let [count, updateCount] = useState(0)
let [count2, updateCount2] = useState(0)
let [count3, updateCount3] = useState(0)
//Only the first console.log event is invoked at the first refresh, //and at consequent update of ANY defined
//state variables e.g. count, count2, count3 in this case, both the statements are called
useEffect(() => {
console.log("First useEffect Called .... "+count+" times..")
return () => {
console.log("Cleanup work being done in the First useEffects lifecycle method ....")
}
})
//Only the first console.log event is printed during first refresh, but the cleanup or the //first console log is NEVER called, at subsequent state updates
useEffect(() => {
console.log("Second useEffect Called .... "+count2+" times..")
return () => {
console.log("Cleanup work being done in the Second useEffects lifecycle method ....")
}
},[])
//First statement is //Called during first refresh, and after that only if the count3 state variable is updated
useEffect(() => {
console.log("Third useEffect Called .... "+count3+" times..")
return () => {
console.log("Cleanup work being done in the Third useEffects lifecycle method ....")
}
}, [count3])
return(
<div>
<p><button onClick={() => updateCount(++count)}>Increase Count</button> <span style={{fontWeight: 'bold'}}>Count = {count}</span></p>
<p><button onClick={() => updateCount2(++count2)}>Increase Count2</button> <span style={{fontWeight: 'bold'}}>Count2 = {count2}</span></p>
<p><button onClick={() => updateCount3(++count3)}>Increase Count3</button> <span style={{fontWeight: 'bold'}}>Count3 = {count3}</span></p>
</div>
)
}
export default App
Manage Performance in React Apps
React components are expected to be re rendered whenever there is a state change, however if there is no state change, we don’t expect React to do the re render, as that would cause performance impact for large applications comprising of a lot of components and JSX code. To prevent unnecessary re renders, use the React.PureComponent instead of React.Component in case of Class based components, and for functional components, use the React.memo() function as below during exporting the component:
export default React.memo(<Component_Name>)
Writing adjacent tags in React’s return()
Ideally, adjacent JSX tags are not allowed in React Components. For example below Component will throw Error:
function App() {
    const listOfPersons = ['Animesh', 'Moumita', 'Aishani', 'SUdipto']
    const [personsNames, updatePersonNames] = useState(listOfPersons)
    return (
          <div style={{border: '3px solid yellow'}}>
              <p style={style}>Learn React</p>
              <Person click={() => updatePersonNames(['Animesh','Moumita'])}>{personsNames}</Person>
          </div>
          <div style={{border: '3px solid yellow'}}>
              <p style={style}>Learn React</p>
              <Person click={() => updatePersonNames(['Animesh','Moumita'])}>{personsNames}</Person>
          </div>
  );
  }
Error Returned : JSX expressions must have one parent element
To get rid of this, you can use the React.Fragment Component to enclose your JSX code as below:
function App() {
    const listOfPersons = ['Animesh', 'Moumita', 'Aishani', 'SUdipto']
    const [personsNames, updatePersonNames] = useState(listOfPersons)
    return (
    <React.Fragment>
          <div style={{border: '3px solid yellow'}}>
              <p style={style}>Learn React</p>
              <Person click={() => updatePersonNames(['Animesh','Moumita'])}>{personsNames}</Person>
          </div>
          <div style={{border: '3px solid yellow'}}>
              <p style={style}>Learn React</p>
              <Person click={() => updatePersonNames(['Animesh','Moumita'])}>{personsNames}</Person>
          </div>
    </React.Fragment>
  );
  }
This works as expected.
Higher Order Components
Higher Order Components (HOC) are basically used to wrap the complete JSX code in a Component and introduce some props or styles globally for that JSX code, that goes as children to the HOC. There are broadly 2 types of HOCs as shown below:
Dummy – This HOC just wraps and does nothing else
App.js
import AuxComponent from './hoc/AuxComponent'

function App() {
    return (
        <AuxComponent>
            <p>This is the classes test</p>
        </AuxComponent>
  );
  }


export default App;

AuxComponent.js
const AuxComponent = (props) => (props.children)
export default AuxComponent
HOC introducing some styles
App.js
import AuxComponent from './hoc/AuxComponent'
import './hoc/AuxComponent.css'

function App() {
    return (
        <AuxComponent styleClass="specificStyle">
            <p>This is the classes test</p>
        </AuxComponent>
  );
  }


export default App;
AuxComponent.js
const AuxComponent = (props) => {
    return(
        <div className={props.styleClass}>
            {props.children}
        </div>
    )
}
export default AuxComponent
Here, you can use the AuxComponent’s styleClass property to declare the styling of the HOC
Using Refs
Refs can be used to create reference to any element in JSX, which you can refer in other places in the code. For example, you can create an input tag and specify a ref attribute e.g. <input type=”text” ref={this.inputRef}>, which needs to be already defined using React.createRef(). Later it can be access using this.inputRef.current, and its value can be access with this.inputRef.current.value
Below examples provides a way to add 2 numbers using refs using Class based and Functional based components.
Refs in Class Component
App.js
import { Component, createRef } from 'react';

class App extends Component {

    constructor(props) {
        super(props)
        this.inputRef1 = createRef();
        this.inputRef2 = createRef();
        this.inputRef3 = createRef();
        this.sum = createRef();
    }

addition = () => {
    this.inputRef3.current.value = Number(this.inputRef1.current.value) + Number(this.inputRef2.current.value)
}

render(){
    return (
        <div>
            <p>This is the classes test</p>
            <input type="text" ref={this.inputRef1}/> + <input type="text" ref={this.inputRef2}/> <button onClick={this.addition}>Add</button> <input type="text" ref={this.inputRef3} />
        </div>
  );
}
}

export default App;
Refs in Functional Component
It works in the same way in Functional Component. Just that the syntax is a bit different. Below is an example:
App.js
import { createRef } from 'react';

const App = () => {

const inputRef1 = createRef();
const inputRef2 = createRef();
const inputRef3 = createRef();

const addition = () => {
    inputRef3.current.value = Number(inputRef1.current.value) + Number(inputRef2.current.value)
}


return (
    <div>
        <p>This is the classes test</p>
        <input type="tex" ref={inputRef1}/> + <input type="text" ref={inputRef2}/> <button onClick={addition}>Add</button> <input ref={inputRef3} />
    </div>
);

}

export default App;
Define PropTypes to define the use of a Component
If you are developing a Component to share with others, or which can be re-used by your team members, define the same in your Component using prop-types module. Example below:
Install the Module
npm install prop-types
Import The Module
import PropTypes from 'prop-types'
Define the Properties
Person.js
import PropTypes from 'prop-types'

export const Person = (props) => {
    return(
        <div style={{textAlign: 'center'}}>
            <h1>This is the Person Component for {props.name} and his age is {props.age}</h1>
        </div>
    )
}

Person.propTypes = {
    name: PropTypes.string,
    age: PropTypes.number
}
Use the Component as per the defined properties
import { Person } from './Person/Person'

const App = () => {

return (
    <div>
        <Person name="Animesh Banerjee" age="fsdnfjsd"/>
    </div>
);

}

export default App;
The above code will render below warning:

Use Context to avoid chaining of props from component to component
When you have many components in the application, it may be required to access some information in many of the downstream components, and the props need to be chained to just pass it from source component to destination. That creates a lot of confusion and it is a bad coding practice to introduce such unnecessary codes. React gives a solution, which is called context. It can be implemented in both Class based and functional components. Example below:
- Define the Context in a Separate JS file
AuthContext.js
import React from 'react'
const AuthContext = React.createContext(
    {
        itemClicked: 'Home',
    }
)

export default AuthContext
2. import the AuthContext and assign it to a static variable contextType
import Aux from "../Aux/Aux"
import './contentBody.css'
import { Component } from "react"
import AuthContext from "../../context/AuthContext"

class ContentBody extends Component {

    static contextType = AuthContext;

    render(){
        return (
            <Aux targetClass="bodyMain">
                <div className="contextText">
                    {this.context.itemClicked}
                </div>
            </Aux>
        )
    }

}
export default ContentBody
3. You can set the values of the context as below:
import Aux from "../Aux/Aux"
import './sidebar.css'
import {React, useContext} from 'react'
import AuthContext from "../../context/AuthContext"

const SidebarElements = (props) => {

    const authContext = useContext(AuthContext)
    const updateContext = (newVal) => {
        authContext.itemClicked = newVal
    }

    return(
        <div className={props.classes} onClick={() => updateContext('RCA')}>
            {props.menu}
        </div>
    )
}

export default SidebarElements
NOTE: Don’t confuse between context and state. context helps to only store some values globally, that is accessible from all components, but changing the context value does not trigger an update of components. On the other hand, updating state triggers an update of the components using that state.
Creating Charts using React
Use the below npm packages to install the charts:
- npm install typescript
- npm install chart
- npm install react-chartjs-2
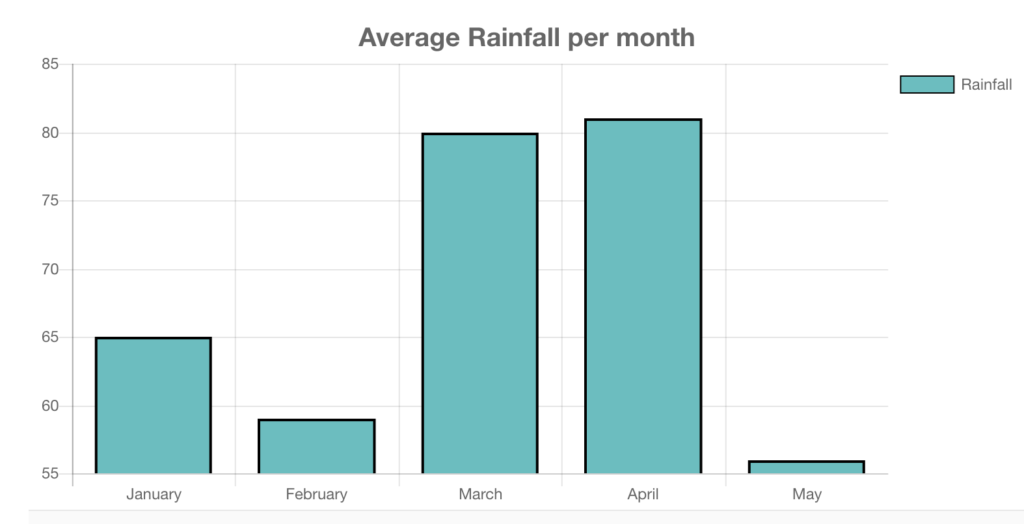
BarChart
import React from 'react';
import {Bar} from 'react-chartjs-2';

const state = {
    labels: ['January', 'February', 'March',
                'April', 'May'],
    datasets: [
        {
        label: 'Rainfall',
        backgroundColor: 'rgba(75,192,192,1)',
        borderColor: 'rgba(0,0,0,1)',
        borderWidth: 2,
        data: [65, 59, 80, 81, 56]
        }
    ]
    }

class BarChart extends React.Component {

  render() {
    return (
      <div>
        <Bar
          data={state}
          options={{
            title:{
              display:true,
              text:'Average Rainfall per month',
              fontSize:20
            },
            legend:{
              display:true,
              position:'right'
            }
          }}
        />
      </div>
    );
  }
}

export default BarChart
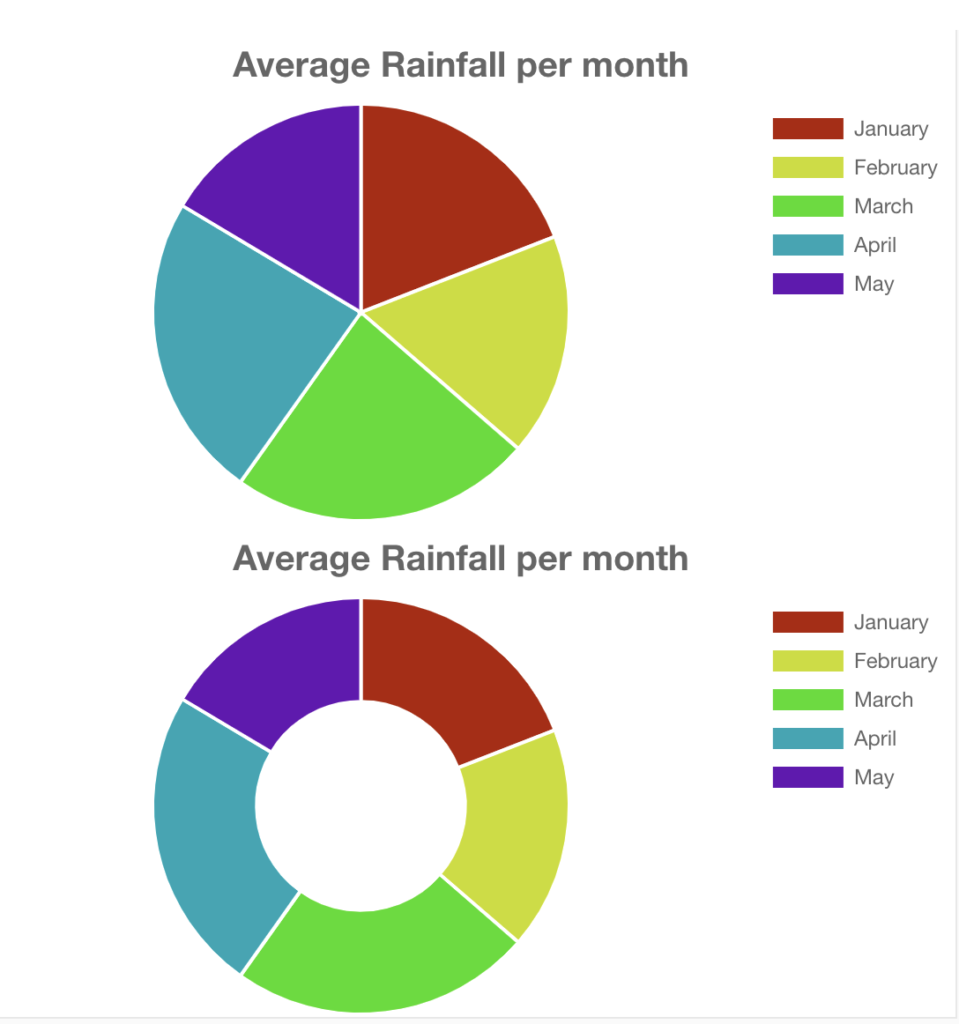
PieChart
import React from 'react';
import {Pie, Doughnut} from 'react-chartjs-2';

const state = {
  labels: ['January', 'February', 'March',
           'April', 'May'],
  datasets: [
    {
      label: 'Rainfall',
      backgroundColor: [
        '#B21F00',
        '#C9DE00',
        '#2FDE00',
        '#00A6B4',
        '#6800B4'
      ],
      hoverBackgroundColor: [
      '#501800',
      '#4B5000',
      '#175000',
      '#003350',
      '#35014F'
      ],
      data: [65, 59, 80, 81, 56]
    }
  ]
}

export default class PieChart extends React.Component {
  render() {
    return (
      <div>
        <Pie
          data={state}
          options={{
            title:{
              display:true,
              text:'Average Rainfall per month',
              fontSize:20
            },
            legend:{
              display:true,
              position:'right'
            }
          }}
        />

        <Doughnut
          data={state}
          options={{
            title:{
              display:true,
              text:'Average Rainfall per month',
              fontSize:20
            },
            legend:{
              display:true,
              position:'right'
            }
          }}
        />
      </div>
    );
  }
}
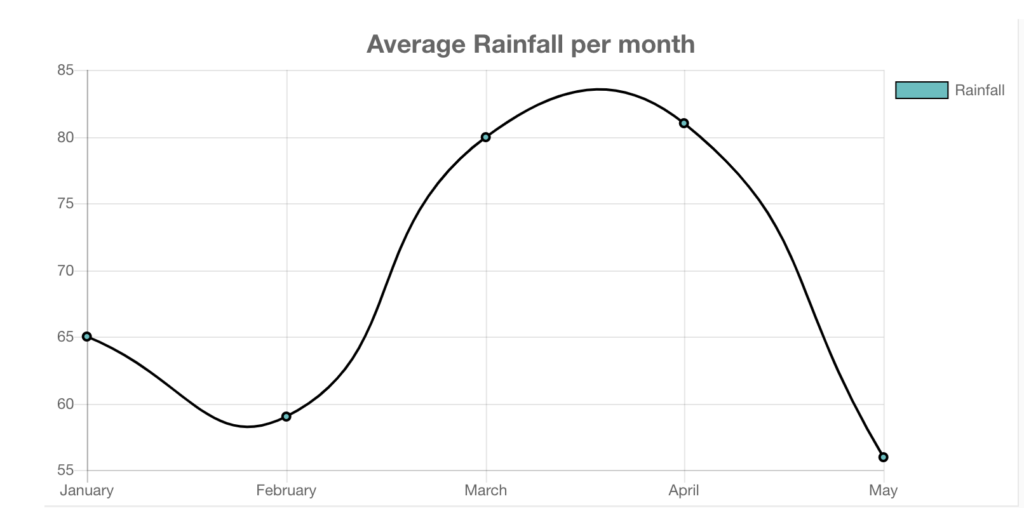
LineGraph
import React from 'react';
import {Line} from 'react-chartjs-2';

const state = {
  labels: ['January', 'February', 'March',
           'April', 'May'],
  datasets: [
    {
      label: 'Rainfall',
      fill: false,
      lineTension: 0.5,
      backgroundColor: 'rgba(75,192,192,1)',
      borderColor: 'rgba(0,0,0,1)',
      borderWidth: 2,
      data: [65, 59, 80, 81, 56]
    }
  ]
}

export default class LineGraph extends React.Component {
  render() {
    return (
      <div>
        <Line
          data={state}
          options={{
            title:{
              display:true,
              text:'Average Rainfall per month',
              fontSize:20
            },
            legend:{
              display:true,
              position:'right'
            }
          }}
        />
      </div>
    );
  }
}
How to make GET and POST calls using React Libraries from Components
Use the axios package to make the GET and POST calls from REACT components
npm install axios
Code for GET Request
        axios.get('https://jsonplaceholder.typicode.com/posts/')
        .then(response => {
          console.log("Response == "+response.status);
        }
        )
Code for POST Request
        axios.post('https://jsonplaceholder.typicode.com/posts/',{
          'name': 'Animesh',
          'email': 'ani@gmail.com',
          'password': 'password'
          }, {
          method: 'POST',
          headers: {
            'content-type': 'application/json'
          }
        })
        .then(response => {
          console.log(response);
        }
        )


One thought on “Get Started with React Apps”